

Last August, I made my daughter an Elsa cake for her third
birthday, and posted a blog about how to do it. It was so well-received that I
figured I’d post another one on making a dragon cake, which I just did for my son’s fifth birthday. This is the cake I was aiming for:

When I first saw the photo, I figured that it must call for
a couple of round cake layers plus a square layer, or even a specially-shaped
cake pan. But believe it or not, all the pieces are cut from a single cake mix baked
in two round cake pans (8” or 9”). And instead of intricate details hand-drawn
in icing, the dragon’s features (even his wings and fiery breath!) are made
from cookies, candies, and fruit roll-ups. The most artistic thing you have to
do for this cake is to cut out the dragon’s wings. Here’s what I used for the
features – but I’m sure you can substitute lots of other kinds of cookies and
candies for the various bits, depending on what you like and what you have on
hand.

- Scales: chocolate-covered graham crackers
- Eyebrows and toes: orange slice gumdrops
- Eyes: marshmallows and chocolate chips
- Nostrils: Hershey’s kisses
- Wings: Fruit roll-ups on a wooden skewer
- Fiery breath: Fruit roll-ups


Once you have all the necessary ingredients and tools
assembled, it’s time to get baking! Bake one standard cake mix (any flavor; I
like golden yellow) in two 8” or 9” round cake pans. My mix called for greasing
and flouring the pan, so I used the old trick of using a little of the cake mix
instead of flour to coat the pan. Let the excess fall back into the batter
before you mix it up. Don’t worry too much about getting exactly the same
amount of batter in each pan – the two halves of one layer will be upright,
back to back, and all the other pieces that do have to match in width come from
the second layer.

While the cake is baking, I clean up the mixing bowls so
there’s room on the counter to cool the cakes. The rule in our house is that
the birthday boy or girl gets first dibs on the beaters, but the baker gets to
lick the bowl. Siblings have to make do with the spatula, or if the birthday
kid is feeling exceptionally generous, they get to lick the second beater.
My mom could tell if a cake was done by how it sprung back
when you touched it, but I always use the toothpick test. If the toothpick
comes out with a trace of batter (or even some sticky crumbs) on it, give it 2
more minutes! Once it’s done, let the layers cool in the pans on a cooling rack
for 15 minutes, then carefully flip them over and let them cool completely.
Never try to frost a warm cake! The frosting will slide all over and make a big
mess, and if you’re cutting the cake into pieces, it’s much easier once the
cake is cool and firm.
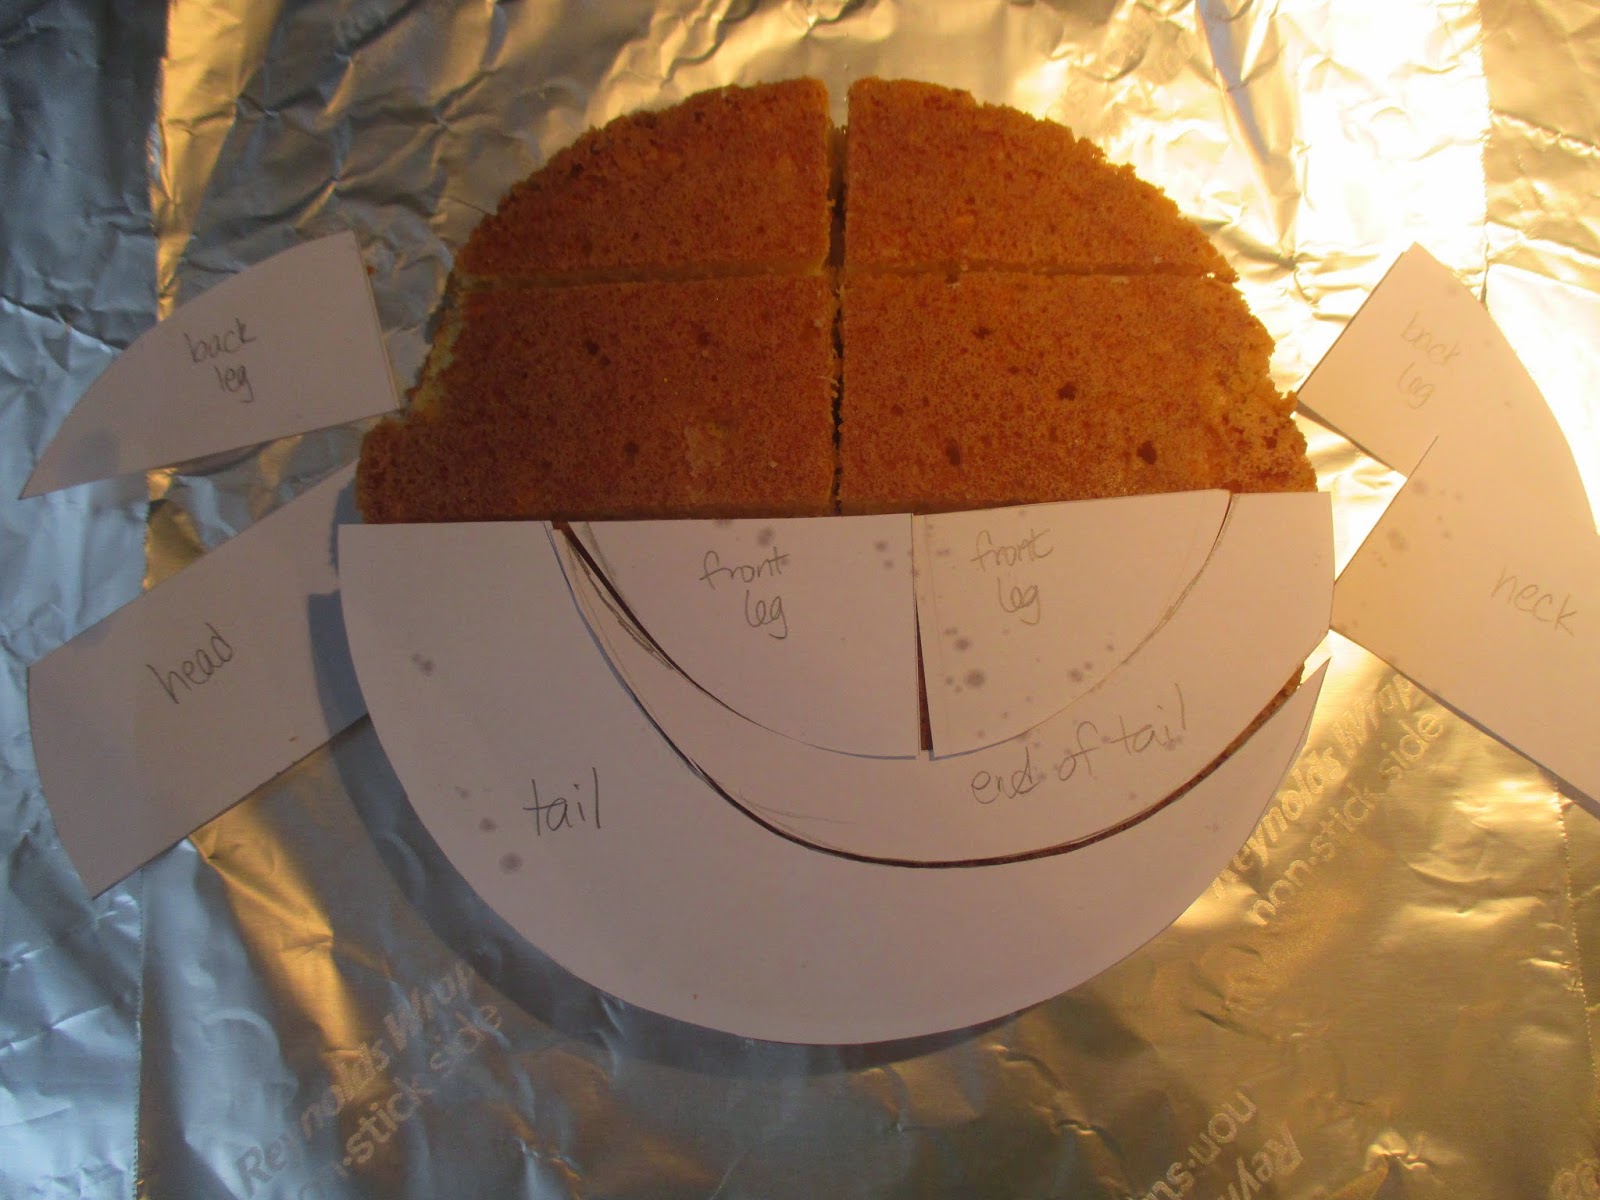
While my cake was cooling, I traced one of the cake pans
onto a piece of paper and made a template for cutting the pieces of one of the
cakes. The second layer is simply cut in half to make the dragon’s body. Even I,
with my lack of artistic skill, can do that without a template!

I cut the paper pattern pieces apart to make it easier to
cut the cake pieces, and when the cake was thoroughly cooled, I trimmed off a
bit of the rounded top of the cake so it laid nice and flat when I flipped it
over (I’ve never mastered the art of baking layer cakes so they don’t crown),
and carefully cut my rounds into their various dragon bits.


I laid two more pieces of regular foil on my cake base and
put the cake rounds onto them, so I could slide them around as I worked. A
serrated bread knife works best for the long, straight cuts – don’t saw back
and forth, simply press straight down (this minimizes crumbs). For the curved cuts, I scored the cake
with a paring knife first, then cut through with a serrated butter knife. I
left the paper patterns on top of the pieces so I wouldn’t get confused about
which piece was which.


Now comes the fun part: assembly! Before I laid out the
pieces, I colored two tubs of store-bought white frosting to be sure they’d
match (16 drops per tub gave a good, dragon-y shade of green). Then I stuck the
two halves of the first layer together back to back (i.e., messy side to messy
side!) to make the dragon’s body and stuck it to the board with a good blob of
frosting. It turned out that I stuck it too close to the back edge of the board
– I’d recommend starting with the tail instead. It’s much easier to center it
on your board that way.


Then you just continue laying out the pieces, sticking them
to the board and/or the adjacent piece(s) with frosting.


You can trim the pieces to fit if you like; the only piece I
trimmed was the head, to make it a perfect rectangle. Don’t worry if there are
gaps between the pieces. Those are easy enough to fill with frosting.
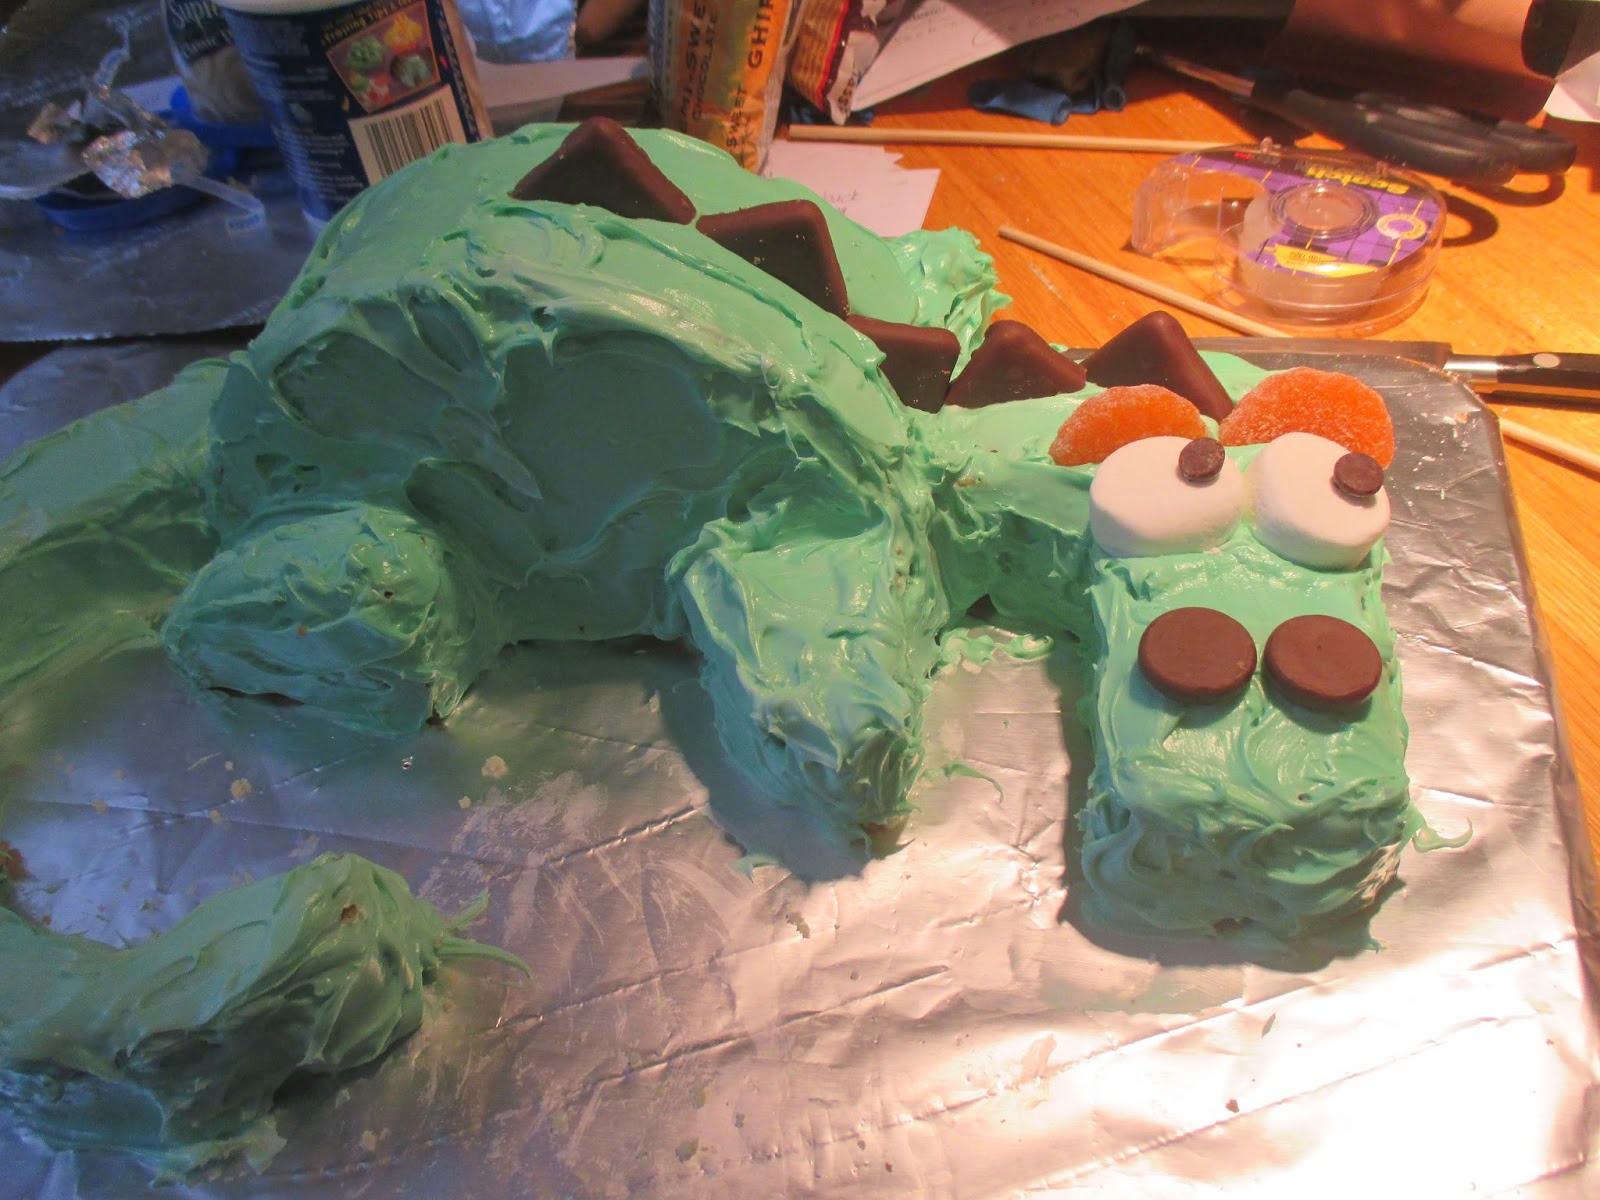
Speaking of frosting, time to frost your dragon! The best
part about frosting a dragon is that dragon hide is kind of lumpy and wrinkly
and anything but smooth. So don’t worry about gloppiness or swirls. It isn’t
messy, it’s texture! If you want to get fancy, you can make it smooth and then use
the tip of a spoon to form scales, or even use a star tip on a frosting bag.
But I think the natural swirls of the frosting look very dragonish.

Next come the face, toes, and scales. For the face, turn two
Hershey’s Kisses upside-down and push them into the cake to form the nostrils.
For the eyes, get a nice fat marshmallow that hasn’t gotten squished out of
shape in the bag, dip your kitchen shears in confectioner’s sugar (to minimize
stickiness), and cut it in half. Push the half-mallows into the frosting right
at the seam between the head and the neck pieces. Then push a chocolate chip
into each marshmallow. I had a hard time getting the chips not to bounce back
out from the springy marshmallows, so I used the tip of my shears to poke a
little hole in the marshmallow so the chips would stay. The orange slices I had
were disproportionately fat to make eyebrows, so I used my kitchen shears again
to cut them in half, then I dipped the sticky side in granulated sugar.


Once my face was in place, I was ready to run a row of
triangular scales the length of my dragon. Cutting the chocolate-covered graham
crackers without shattering took a bit of finesse. I found that the most
successful method was using a serrated knife and pressing or even rocking instead
of sawing, much like cutting the cake. The pieces that broke off at the corner
worked well at the base of the tail, or I cut them again, a bit smaller, to use
toward the tip of the tail. Since the crackers are rectangles rather than
squares, you have to cut each cracker twice, resulting in two triangular scales
but also a long, skinny rhombus from which all the calories have leaked out.
(In other words, go ahead and eat a few! You’ve earned them!)

Then I cut a few more orange slices for the toes: first, cut
the slices in half (dipping in sugar as before), then cut the edges off at an
angle to make claws. I used the sticky side to hold the toes in place instead
of dipping them in sugar after these cuts.


The penultimate step is making fiery dragon breath from
fruit roll-ups. I found a package that had mixed colors in it, including “cherry
orange wildfire,” which happens to be perfect for dragon breath. I snipped out
some long tongues of fire and stuck them to the dragon’s snout, leaving a few
of the top layers rippled for a 3-D effect.


I made the cake the day before my son’s birthday, so I
decided to wait until right before the party to add the wings, in case they
sank a bit overnight. So an hour or so before the party, I grabbed a couple of
bamboo skewers and two packs of fruit roll-ups labeled “tropical tie-dye,”
unrolled them, wrapped them around the skewers (trimming off one corner) and stuck them to themselves to hold them in place (they’re pretty much edible saran wrap), scalloped the edges with my
trusty kitchen shears, then impaled my dragon (who, fortunately, didn’t seem to
mind in the slightest). The dragon, the birthday boy, and I were all quite pleased
with the results.

See? Totally do-able, even for a non-artist!
.JPG)
No comments:
Post a Comment