Thursday, November 6, 2014

The 2014 Country Music Awards: Red Carpet Review

I must admit that I look forward to the CMAs every year with a bit of guilt, because what I love most about them is that there is inevitably at least one person wearing a ridiculously over-the-top, look-at-me-I’m-a-cowboy outfit. I’m rather disappointed not to have seen any of that this year, although I was fortunate enough to tune in early enough to catch a number that featured all the singers and an inexplicable 20-member snare drum band wearing costumes trimmed in color-changing LED rope, so I did fill my “weird and outrageous” quota for the evening. But on to the fashion critiques!


The biggest fashion trend this year can be summed up in three words: Black is back. Seriously, of all the dresses I saw in the red carpet photos, about six of them were not black, and of those six, only two were not a shade of white or champagne. So I’ll begin with kudos to Connie Britton for bucking the trend!


Her bottle green lace dress over a black underlay was striking, and the length was just perfect for showing off those gorgeous legs. Her face seemed a bit colorless, but her simple strappy sandals and dark pedicure were a great choice.
Surprisingly for such a casual event (in red carpet terms, at least), Britton was among very few attendees wearing short dresses. 

Another attendee rocking a shorter dress was Martina McBride, in a flared black-and-gold frock.


The skirt would have been more flattering had it been just a few inches shorter or a bit less full, but it was helped by being slightly see-through toward the hem. I’d have gone with flashier gold (or at least black-and-gold) shoes instead of boring pointy pumps, but her gorgeous chestnut locks and hint of coppery lips drew attention up toward her lovely face.

Carrie Underwood, one of my personal fashion favorites, split the short skirt-long-skirt difference by wearing an asymmetrically-hemmed, glittery champagne-colored gown with matching pumps (and matching hair, come to think of it). 


Something about where the waistline falls is not terribly flattering on her (at several months pregnant, what is?), but the cascading ripples of bedazzled fabric tempered by a plain underskirt is so feminine and pretty that I can’t complain too much. (I did watch enough of the awards themselves to see that she changed her outfit at least ten times, and I will refrain from commenting on her other dresses except to say that it might have been easier on all concerned if she’d just worn the dress she wore to the Grammys in 2013 and let them project a different pattern on it every time she came on stage.)

But here’s something that I CAN complain about: Oh, Kacey Musgraves. My children adore your song “Heartache Song,” and your voice is as cute as a bug’s ear. But WHAT IS UP WITH YOUR HAIR????


Did you lose a bet? Are you smuggling contraband up there? Did your hairdresser have an unfortunate break with reality? Because, honey, no. Just….NO.

The next “Just…NO” outfit is credited to Lily Aldridge. Yes, dear, you’re a Victoria’s Secret model. However, you should probably still wear more than your underwear when you’re not at a VS shoot.


Also, what does this dress look like when you’re standing like a normal human being instead of crossing your feet and sticking you right hip out six inches? Just…NO.

A slightly unconventional dress that I did love, however, was sported by Clare Bowen.


The bodice is just vaguely reminiscent of an old western saloon girl, topping a huge froth of white speckled with black. This gown manages to be effortlessly sexy, cute, and fun all at once, and Ms. Bowen is obviously having a wonderful time in it.

Rachel Holder and Kelli Pickler wore similar spangled black columns with varied degrees of success.


Holder’s gown features a plunging neckline with metallic discs covering the bodice and unfortunately emphasizing (or possibly even creating) a bit of a pot belly. The tiny flared train, loose waved ‘do, and feminine makeup were nice details; the studded biker-chick clutch not so much. Pickler’s gown was a bit more unconventional yet conservative, with narrow modesty panels separating fabric with different patterns of rhinestones. The perfect tailoring of the gown, slicked-back platinum locks, silver clutch, and subtle train all added to one of the loveliest looks of the evening.

One of the fun parts of the CMAs is the number of married couples who are both in the business. 


Faith Hill and Tim McGraw went for old-school glamour; her in a slim, studded retro gown that reminded me of Barbra Streisand’s famous Bob Mackie pantsuit from the 1969 Oscars, and him in an impeccable and classic shawl-collar tuxedo with hand-tied bow tie and a black Stetson. 


Blake Shelton and Miranda Lambert went a bit more casual but equally stunning; she in a champagne-pink Grecian-style gown with ruched bodice, and he in a black jacket and vest over a deep charcoal dress shirt and tie, and tastefully faded dark-wash jeans. 


And Trisha Yearwood and Garth Brooks also looked smashing in unrelieved black; her in a high-necked, long-sleeved gown with a generous train that was just tailored enough to avoid looking frumpy, and he in a black suitcoat over a black collarless shirt, black jeans, black cowboy boots, and of course, his trademark black hat.

I’d also like to call attention to a few groups who caught my eye. 


The Eli Young Band gave the impression of some grunge guys who worked really hard to clean themselves up for the evening. Shined shoes, crisp coats of various textures, and just enough color and variation in their shirts to give them personality, and washed and neatly combed hair. Nicely done, gentlemen.


Lady Antebellum looked cutting edge with the men in fashionably slim-fitting suits and skinny ties, and the lady in a gown that showed off her voluptuous figure without looking trashy (never an easy feat). 


Little Big Town was all over the map, with one gentleman in a modern, slim-fitting eggplant suit and another in a black-and-white tuxedo; while the ladies also split the look with one in a simple (perhaps slightly too simple) pale copper dress and matching shoes and the other in a spangled white gown covered by a wrap that appears to be made of muppet fur. Any one of the looks alone might have worked, but put them all together and it’s just a discombobulated mish-mash.


Parmalee was another all-male group that looked like they had made a concerted effort to clean up for the CMAs. Their look was a bit more casual and country than some others, but they looked much more natural and at ease than many other groups. The dark wash jeans and overall dark colors worked to tie their looks together, but still allowed for the individuality of a bright cobalt shirt and plum velvet jacket here, an oversized belt buckle there, and some gold chains on another. Good job unifying what appears to be very different personalities and styles.

But now let’s move on to a category that hit it out of the park at the 2014 CMAs: the men. Their styles ranged from tuxedos to jeans, from 10-gallon hats to baseball caps, from classic black and white to vivid colors and textures. 


Once I was able to pull my focus away from Dustin Lynch’s 10,000-gigawatt smile and adorable dimples, I noticed the beautiful detailing of his deep blue tuxedo, from the satin collar to the crisp, open-collared dove-gray shirt, to the perfectly fluffed pocket square, to the satin hatband that perfectly matching the satin piping on the jacket pockets. This is a man who knows how to dress for the occasion.


Jon Pardi went with an informal look, but I had to mention him for the charm of this unusual single-button wide-wale corduroy jacket featuring feathery appliques perfectly coordinated with his pocket square. It worked nicely with the crisp white open-collared shirt, fashion-forward jeans, and just a glimpse of a giant belt buckle. Very western and very fun!


Darius Rucker has come a long way since his Hootie days, and his fashion has come a long way as well. He looks like the professor all the girls have a crush on in this deep blue velvet jacket, long tie, blue jeans, trendy glasses, and just a hint of grey in his neatly-trimmed beard. 


And last, but certainly not least, kudos to Josh Turner for this beautifully-tailored subtle plaid 3-piece suit with bias pockets worn over an open-collared dark plum dress shirt. Classic and dressy without being formal, it’s a perfect look for the CMAs.

Bookmark and Share

Wednesday, November 5, 2014

Diet Tips from a Diet-Hatin', Carb-Lovin' Mom

I hate dieting. I’ve always hated dieting. You know why? Because I love food. Especially unhealthy food. I love carbs, I love fat, I love sugar. Give me a piece of nutrition-free white bread slathered with real butter, sprinkled with overly-processed white sugar, and topped with bacon and I am a happy camper.

But I also hate not fitting into my pants. I hate having a visible pantyhose line at my waist when I wear a jersey dress. I hate having to decide whether to hike the top of my underwear over my muffin top or whether to let my muffin top hang over the top of my underwear. I hate thigh chafing. I hate the 20 pounds that have crept up on me since I hit my mid-40s.

And so, hello diet.

Diets are hard for me because I don’t like a lot of healthy foods. I dislike nearly every kind of fruit and vegetable. Snacking on carrot sticks and celery is cruel and unusual punishment for me. Serving myself a larger portion of vegetables and a smaller portion of starch at dinner is completely unsatisfying. But after much trial and error, I’ve come up with a few ways that help me to watch what I’m eating and to eat healthier. Hopefully they might be helpful to some of you, too!

Watch your portion size
I am a typical American in that I eat much more of everything than I should. For lunch, I’ll often have a bowl of soup. By which I mean a can of soup. By which I mean roughly 2.5 servings of soup. And it never occurred to me before that I’m eating nearly three times what I should! So before I serve myself, I think about what the “correct” portion size is. If I’m eating some kind of prepared food, I read the label, and if the package is 2 servings, I only eat half. It also helps to calculate the calories – that can of “healthy” soup touts itself as 100 calories per serving, but if I eat the whole thing I’m getting 250 calories!!

Watch portion sizes on side dishes, too. That big scoop of mashed potatoes or rice is definitely larger than a single serving, and three pieces of bread is three times what you should be eating.

Use side dishes as appetizers
My husband works late hours, so I’ll often feed the kids early and then he and I will have supper after they go to bed. But I’ll usually make us an appetizer to tide us over – often something not terribly healthy, like a plate of nachos or a bowl of lobster bisque. But having an appetizer wouldn’t change what we ate for dinner, it just added on those extra calories. So now, if I’m hungry before dinner, I’ll try to eat one of my dinner side dishes as an appetizer and then just leave it off my dinner plate. If the dinner menu is salmon, rice pilaf, and peas, for example, I’ll heat up one serving of peas and eat it early, then I’ll have just the salmon and rice at supper time. Or if we’re having spaghetti and meatballs with salad, I’ll eat my salad early, or maybe I’ll have a couple of meatballs and then have plain pasta at supper. That way I’m not adding extra calories, I’m just spreading them out.

Eat treats sparingly every now and then
Nothing makes me binge like feeling totally deprived of the “good stuff,” so I allow myself a treat every now and then. I just try to be very reasonable about it. On Halloween night, I picked out one of my favorite (snack size!) candy bars from the kids’ bags and let myself enjoy it. On my son’s birthday, I took a very small piece of cake and savored it. Once or twice a week I’ll let myself have a small cocktail or glass of wine. Don't let yourself feel guilty about it, though.

Write down everything you eat for a week
A good way to start a diet program is to be aware of what – and when – you’re eating. You may feel like you’re not overeating at all, but when you write down every single thing you put in your mouth for a week, you may realize where those sneaky little calories are creeping in. You take one piece of candy from the receptionist’s candy dish twice a day – not much, but when you add it up, that’s 2,000 calories a week!! You grab a small Dunkin Donuts coffee with cream and sugar every day on the way to work – at 120 calories a pop, you’ve just added 600 calories a week, and that’s not counting the 200-calorie Starbucks Coffee Frappuccino you “splurge” with on Saturday morning.

Weigh yourself once a week ONLY – and write it down
If you’re like me, your weight fluctuates a couple of pounds on a regular basis. So don’t weigh yourself every single day – you’ll drive yourself nuts. Pick a day of the week and weigh yourself first thing in the morning on that day, every week. And write it down. Make a graph, even. Gaining back a pound or two every once in a while is a lot less frustrating when you can see the general downward trend.

Use snack tricks
When you’re DYING for a snack – absolutely MUST eat something, RIGHT NOW – make yourself wait five minutes. Set a timer. And while you’re waiting, drink a big glass of water. If, at the end of that five minutes, you’re still dying for a snack? Go ahead and have a small, sensible snack. Try to go for fruit and veggies if that will satisfy you. Even a small glass of milk can be a satisfying snack. If you must, go for sweet or salty snacks – but don’t ever snack right from the bag. Prepare ahead of time – get some snack-sized Ziploc bags and fill them with small snacks: four Ritz crackers, a handful of roasted peanuts, a single Oreo, a couple of cheese cubes, half a dozen M&Ms. Don’t stuff it in your mouth, either. Nibble it, savor it, make it last.

Put the good stuff on top
This is actually a trick I learned from Oprah – I saw an interview with her personal chef one day and she suggested using unhealthy but delicious foods like cheese and nuts and bacon by putting them sparingly on top of a dish instead of mixing them in – you can use much less but taste it more. So sprinkle a tiny bit of shredded cheese on top of your mashed potatoes instead of baking the cheese inside, top your salad with a couple of crumbles of feta and a few pecans instead of stirring in a big bunch, bake a chicken breast with just a sprinkle of panko and parmesan instead of coating the whole thing, crumble up half a piece of bacon on top of your scrambled eggs for breakfast.


Dieting still isn’t fun, and it isn’t easy, but these tips help make it a little more manageable for me, and I hope they help you, too. Happy dieting!


Bookmark and Share

Monday, November 3, 2014

How to Make a Dragon Cake without a Special Pan (or Any Artistic Talent Whatsoever)

Last August, I made my daughter an Elsa cake for her third birthday, and posted a blog about how to do it. It was so well-received that I figured I’d post another one on making a dragon cake, which I just did for my son’s fifth birthday. This is the cake I was aiming for:


When I first saw the photo, I figured that it must call for a couple of round cake layers plus a square layer, or even a specially-shaped cake pan. But believe it or not, all the pieces are cut from a single cake mix baked in two round cake pans (8” or 9”). And instead of intricate details hand-drawn in icing, the dragon’s features (even his wings and fiery breath!) are made from cookies, candies, and fruit roll-ups. The most artistic thing you have to do for this cake is to cut out the dragon’s wings. Here’s what I used for the features – but I’m sure you can substitute lots of other kinds of cookies and candies for the various bits, depending on what you like and what you have on hand.
  • Scales: chocolate-covered graham crackers
  • Eyebrows and toes: orange slice gumdrops
  • Eyes: marshmallows and chocolate chips
  • Nostrils: Hershey’s kisses
  • Wings: Fruit roll-ups on a wooden skewer
  • Fiery breath: Fruit roll-ups
The first thing I do any time I make a fancy decorated cake like this is to lay out everything I need – there’s nothing worse than being halfway done and suddenly realizing that you’re out of licorice whips or red hots or that your cake stand is in the dishwasher or that some other item that you need is not close at hand. Doing this reminded me that this is not a cake that can be put together on my usual pedestal cake stand. You need a rectangular base roughly two feet by one and a half feet. I happen to have a large wooden cutting board that makes a nice, solid cake plate, so I covered that with heavy-duty foil (for width) and anchored it to the back of the board with a few pieces of Scotch tape. I leave the dull side of the foil out to avoid reflecting the camera flash too much in the inevitable photos.

 (Be sure the side with the drainage ditch is on the bottom!)

Once you have all the necessary ingredients and tools assembled, it’s time to get baking! Bake one standard cake mix (any flavor; I like golden yellow) in two 8” or 9” round cake pans. My mix called for greasing and flouring the pan, so I used the old trick of using a little of the cake mix instead of flour to coat the pan. Let the excess fall back into the batter before you mix it up. Don’t worry too much about getting exactly the same amount of batter in each pan – the two halves of one layer will be upright, back to back, and all the other pieces that do have to match in width come from the second layer. 


While the cake is baking, I clean up the mixing bowls so there’s room on the counter to cool the cakes. The rule in our house is that the birthday boy or girl gets first dibs on the beaters, but the baker gets to lick the bowl. Siblings have to make do with the spatula, or if the birthday kid is feeling exceptionally generous, they get to lick the second beater.

My mom could tell if a cake was done by how it sprung back when you touched it, but I always use the toothpick test. If the toothpick comes out with a trace of batter (or even some sticky crumbs) on it, give it 2 more minutes! Once it’s done, let the layers cool in the pans on a cooling rack for 15 minutes, then carefully flip them over and let them cool completely. Never try to frost a warm cake! The frosting will slide all over and make a big mess, and if you’re cutting the cake into pieces, it’s much easier once the cake is cool and firm.

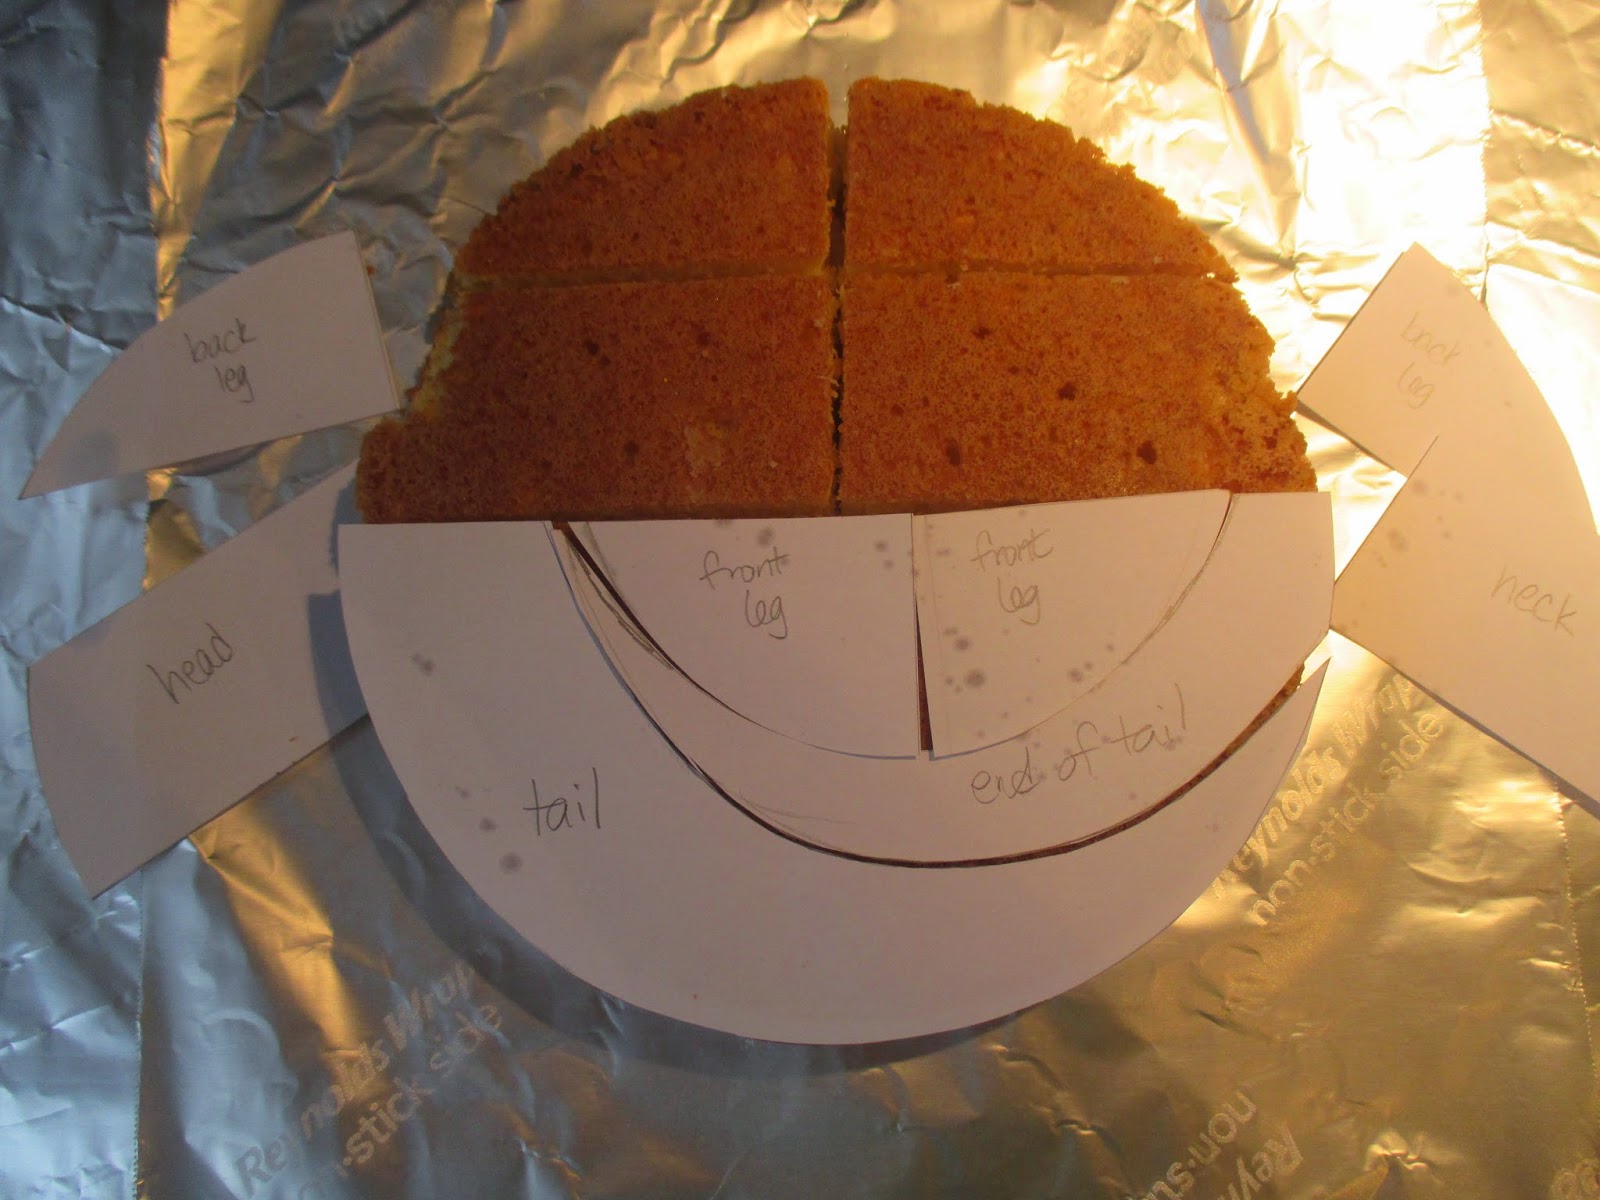
While my cake was cooling, I traced one of the cake pans onto a piece of paper and made a template for cutting the pieces of one of the cakes. The second layer is simply cut in half to make the dragon’s body. Even I, with my lack of artistic skill, can do that without a template!


I cut the paper pattern pieces apart to make it easier to cut the cake pieces, and when the cake was thoroughly cooled, I trimmed off a bit of the rounded top of the cake so it laid nice and flat when I flipped it over (I’ve never mastered the art of baking layer cakes so they don’t crown), and carefully cut my rounds into their various dragon bits.


I laid two more pieces of regular foil on my cake base and put the cake rounds onto them, so I could slide them around as I worked. A serrated bread knife works best for the long, straight cuts – don’t saw back and forth, simply press straight down (this minimizes crumbs). For the curved cuts, I scored the cake with a paring knife first, then cut through with a serrated butter knife. I left the paper patterns on top of the pieces so I wouldn’t get confused about which piece was which.


Now comes the fun part: assembly! Before I laid out the pieces, I colored two tubs of store-bought white frosting to be sure they’d match (16 drops per tub gave a good, dragon-y shade of green). Then I stuck the two halves of the first layer together back to back (i.e., messy side to messy side!) to make the dragon’s body and stuck it to the board with a good blob of frosting. It turned out that I stuck it too close to the back edge of the board – I’d recommend starting with the tail instead. It’s much easier to center it on your board that way.


Then you just continue laying out the pieces, sticking them to the board and/or the adjacent piece(s) with frosting.


You can trim the pieces to fit if you like; the only piece I trimmed was the head, to make it a perfect rectangle. Don’t worry if there are gaps between the pieces. Those are easy enough to fill with frosting.

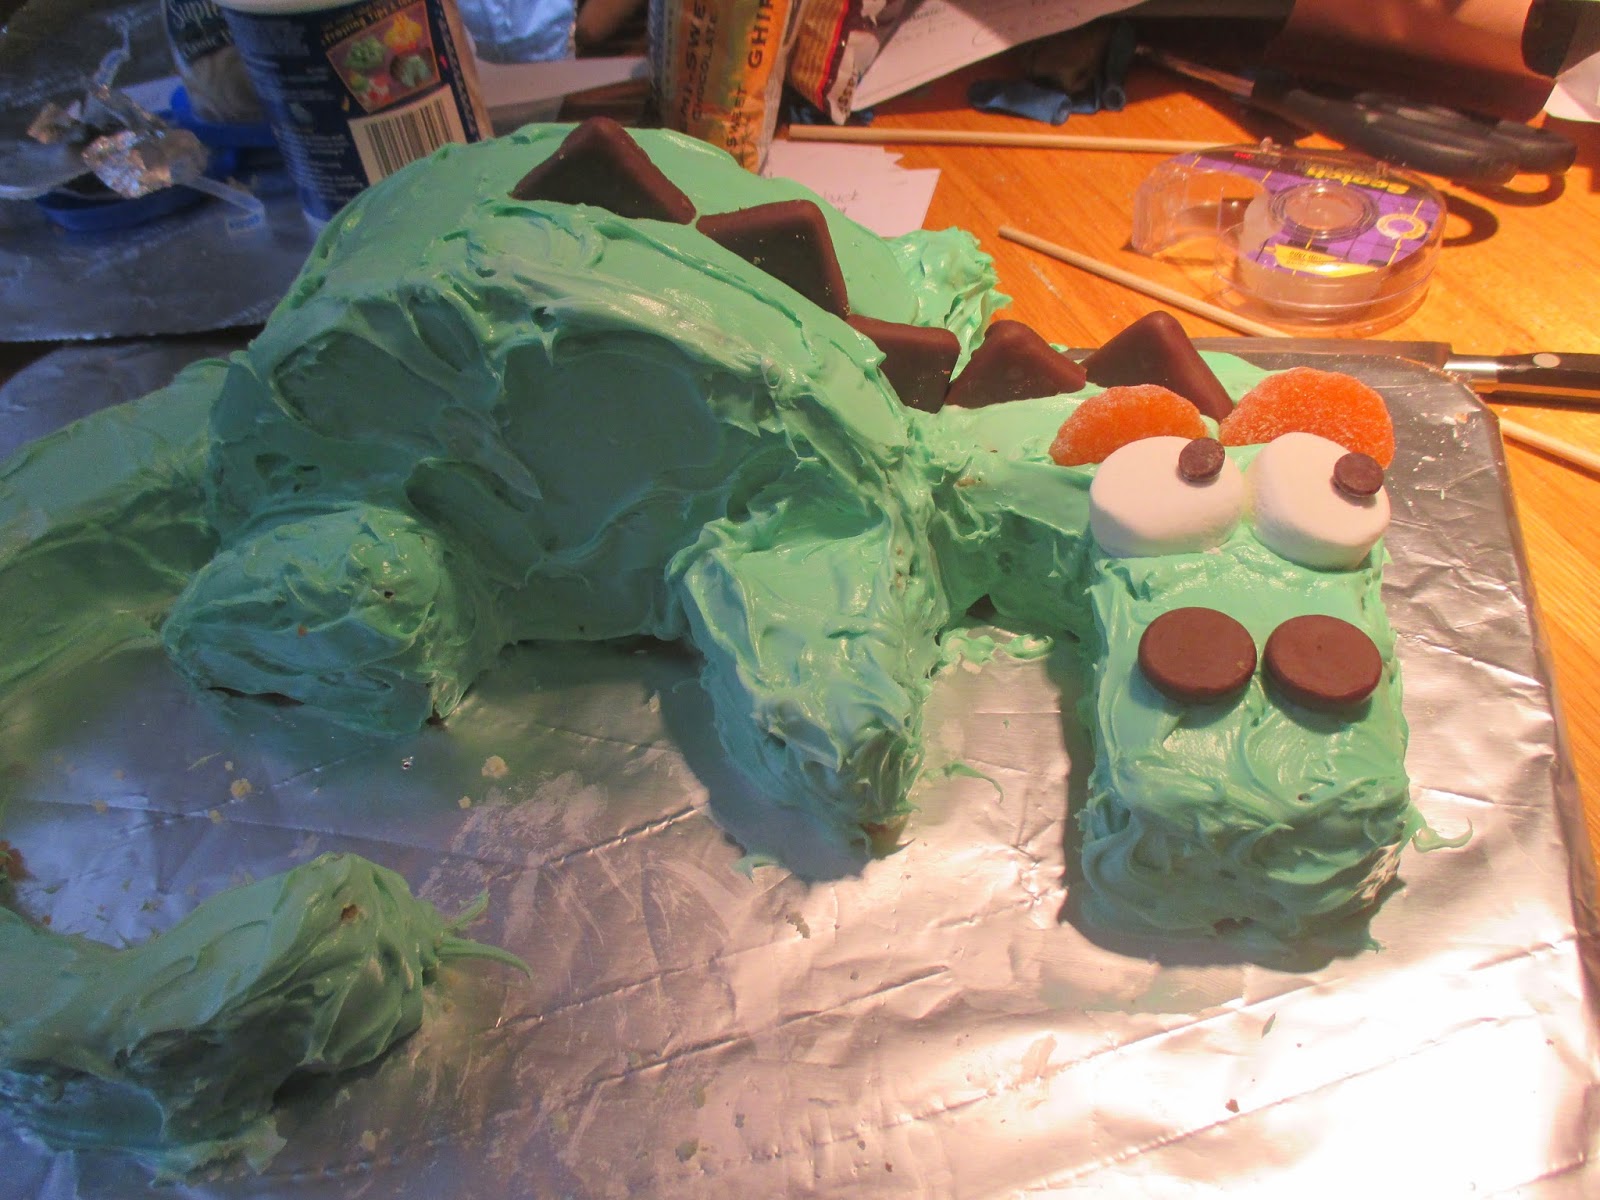
Speaking of frosting, time to frost your dragon! The best part about frosting a dragon is that dragon hide is kind of lumpy and wrinkly and anything but smooth. So don’t worry about gloppiness or swirls. It isn’t messy, it’s texture! If you want to get fancy, you can make it smooth and then use the tip of a spoon to form scales, or even use a star tip on a frosting bag. But I think the natural swirls of the frosting look very dragonish.


Next come the face, toes, and scales. For the face, turn two Hershey’s Kisses upside-down and push them into the cake to form the nostrils. For the eyes, get a nice fat marshmallow that hasn’t gotten squished out of shape in the bag, dip your kitchen shears in confectioner’s sugar (to minimize stickiness), and cut it in half. Push the half-mallows into the frosting right at the seam between the head and the neck pieces. Then push a chocolate chip into each marshmallow. I had a hard time getting the chips not to bounce back out from the springy marshmallows, so I used the tip of my shears to poke a little hole in the marshmallow so the chips would stay. The orange slices I had were disproportionately fat to make eyebrows, so I used my kitchen shears again to cut them in half, then I dipped the sticky side in granulated sugar.


Once my face was in place, I was ready to run a row of triangular scales the length of my dragon. Cutting the chocolate-covered graham crackers without shattering took a bit of finesse. I found that the most successful method was using a serrated knife and pressing or even rocking instead of sawing, much like cutting the cake. The pieces that broke off at the corner worked well at the base of the tail, or I cut them again, a bit smaller, to use toward the tip of the tail. Since the crackers are rectangles rather than squares, you have to cut each cracker twice, resulting in two triangular scales but also a long, skinny rhombus from which all the calories have leaked out. (In other words, go ahead and eat a few! You’ve earned them!)


Then I cut a few more orange slices for the toes: first, cut the slices in half (dipping in sugar as before), then cut the edges off at an angle to make claws. I used the sticky side to hold the toes in place instead of dipping them in sugar after these cuts. It’s up to you whether you make a three-toed dragon or a four-toed dragon. I kind of got sick of cutting up orange slices after three toes per foot, so voila! Three-toed dragon.


The penultimate step is making fiery dragon breath from fruit roll-ups. I found a package that had mixed colors in it, including “cherry orange wildfire,” which happens to be perfect for dragon breath. I snipped out some long tongues of fire and stuck them to the dragon’s snout, leaving a few of the top layers rippled for a 3-D effect.


I made the cake the day before my son’s birthday, so I decided to wait until right before the party to add the wings, in case they sank a bit overnight. So an hour or so before the party, I grabbed a couple of bamboo skewers and two packs of fruit roll-ups labeled “tropical tie-dye,” unrolled them, wrapped them around the skewers (trimming off one corner) and stuck them to themselves to hold them in place (they’re pretty much edible saran wrap), scalloped the edges with my trusty kitchen shears, then impaled my dragon (who, fortunately, didn’t seem to mind in the slightest). The dragon, the birthday boy, and I were all quite pleased with the results.


See? Totally do-able, even for a non-artist!


Bookmark and Share